ⓘ After a firmware update disabled local access, the goal is to restore the remote control functionality of the Hills Alarm/Interlogix Ultrasync system in Home Assistant.
🗒️ On December 6, 2023, I contacted GP Carrier Global to get their approval for this blog post. They informed me that the CommNav module is no longer supported and strongly suggested to switch to the latest version, the RelianceXR range.
Embarking on the journey to create a seamlessly integrated smart home experience can sometimes demand unconventional solutions. In this blog post, I share my personal exploration into the fusion of my home security system with Home Assistant, a venture that led me to delve into the world of ethical hacking to achieve the level of connectivity I envisioned.
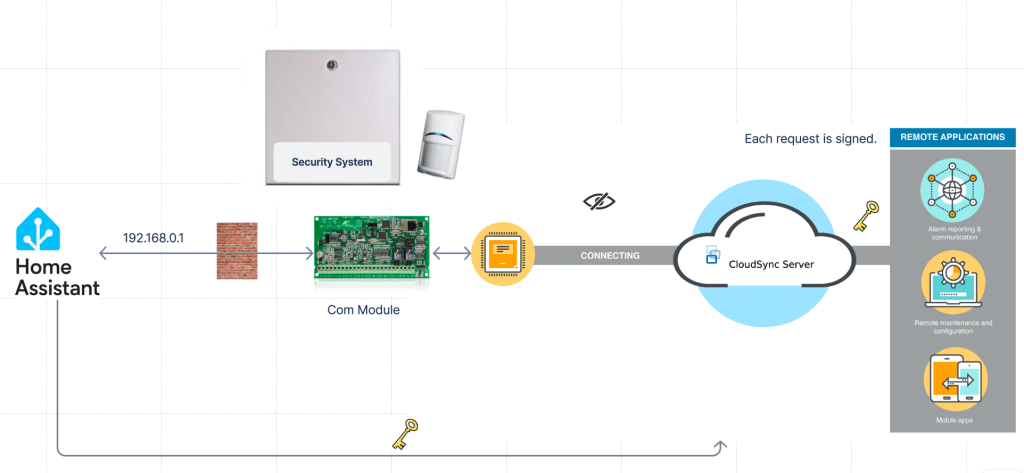
Having successfully incorporated various sensors into my Home Assistant automation, the final piece of the puzzle was integrating my Hills Alarm system. Typically, Hills security systems offer continuous internet connectivity through the Hills ComNav Unit Service and the UltraSync+ smartphone app. Additionally, local access is facilitated through a built-in web interface, which is crucial for Home Assistant integration. However, this seamless connection was disrupted after a firmware update blocked the previously accessible local interface.
Regrettably, this rendered my unit nonfunctional upon unboxing. Nevertheless, a silver lining exists, as I can still access ComNav when the alarm is in programming mode and via the UltraSync+ mobile app. The challenge, however, lies in the inability to maintain the alarm system in this mode permanently.
UltraSync+
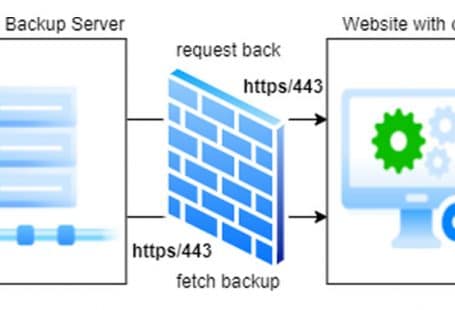
Utilizing the UltraSync+ mobile app, accessing ComNav over the Internet is still a viable option. We need to investigate the matter and determine if establishing a connection between our Home Assistant and the alarm system via the Internet is feasible. Despite potential latency concerns, this currently stands as the sole viable path forward.
Burp
When examining the information flow between a mobile app and a server, I rely on Burp. This method is universally applicable, as it doesn’t require an Android phone or a jailbroken iPhone.
On my iPhone, I configured a proxy to direct to Burp and hoped for the best. Luckily, the majority of apps didn’t hinder the proxy’s usage, enabling me to inspect the communication between the app and the backend server.
This data can then be compared with the traffic observed when accessing the web interface on the ComNav directly from either Home Assistant or a browser.
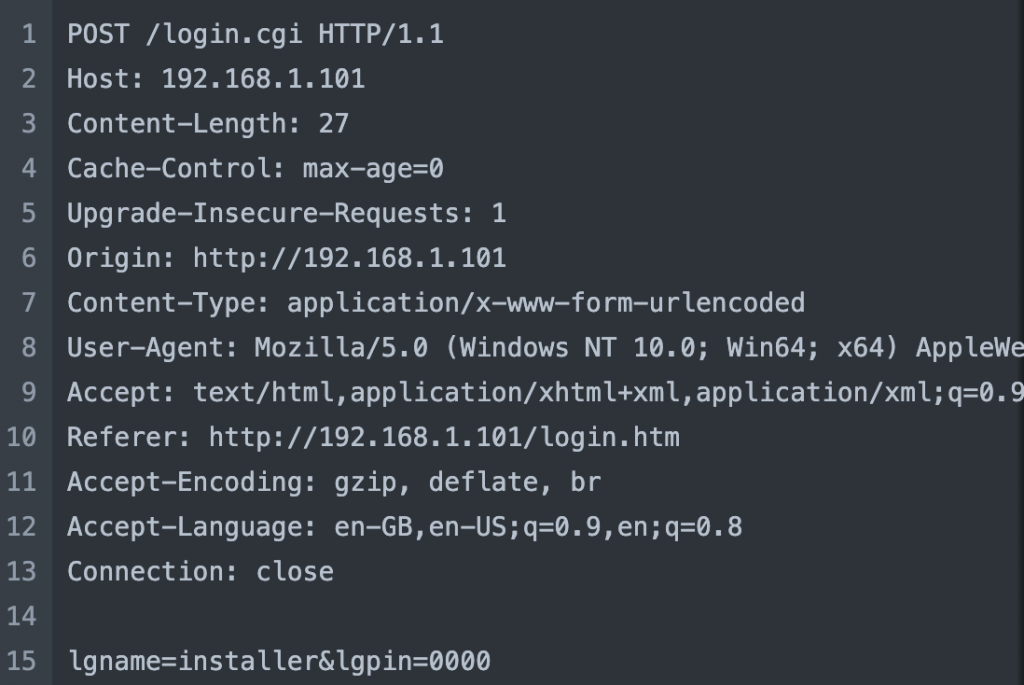
![]() Local browser:
Local browser: 192.168.1.101
REQUEST
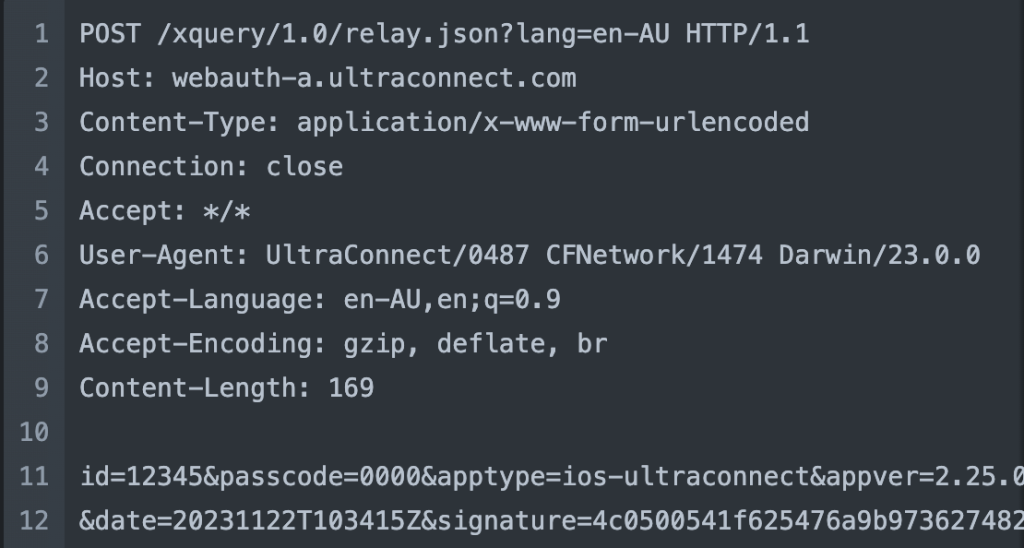
![]() Mobile app:
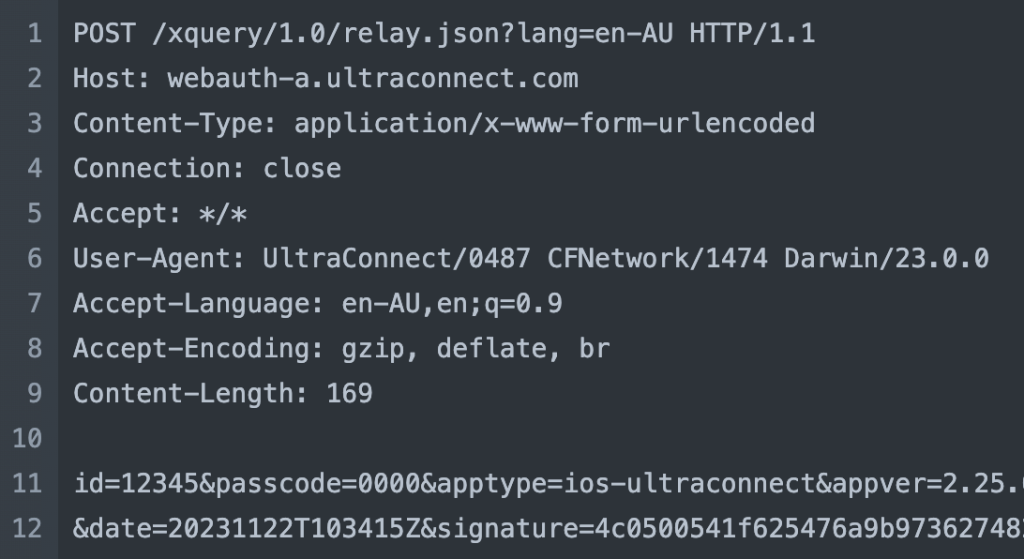
Mobile app: webauth-a.ultraconnect.com
REQUEST
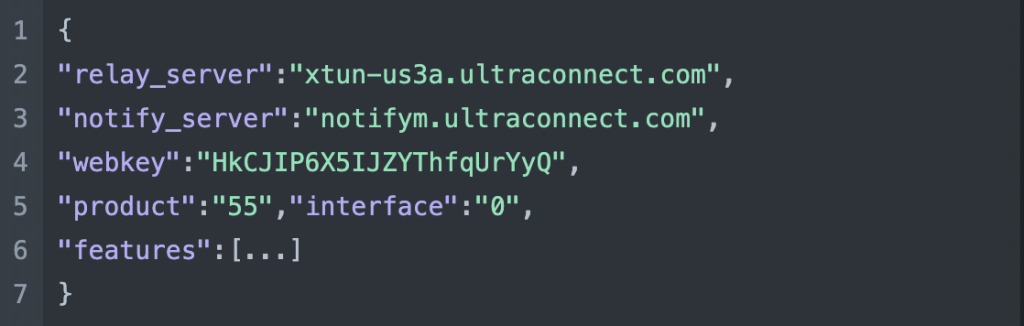
REPLY
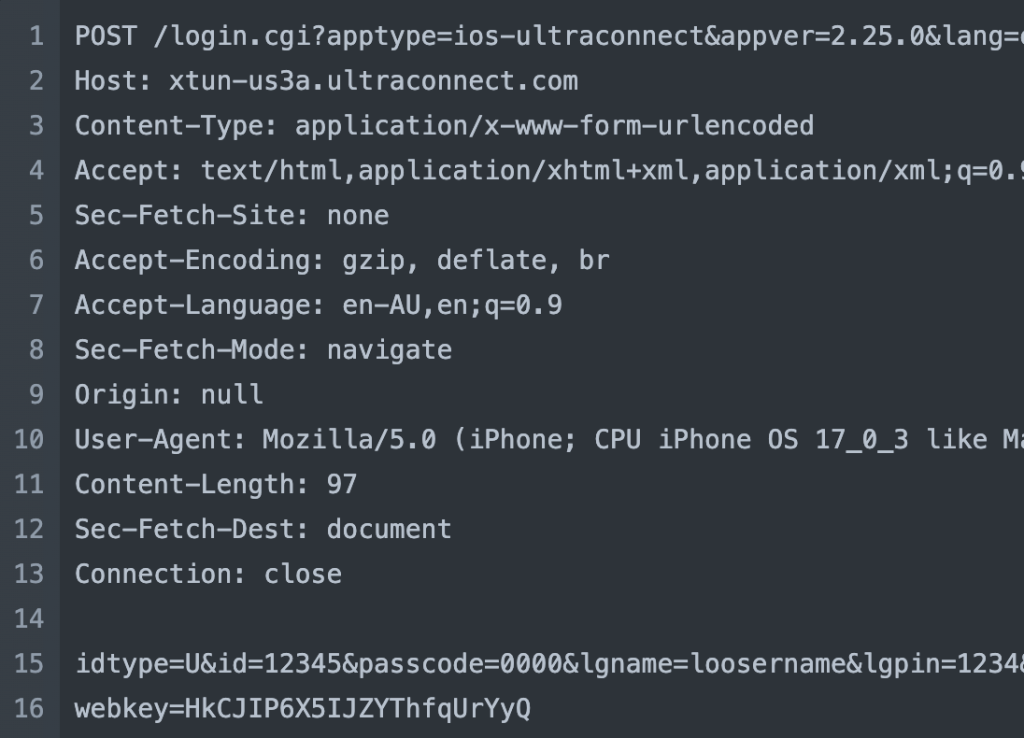
followed by
REQUEST
Upon initiation, the mobile app initiates a request to the relay server for the host and webkey. Notably, this request is signed with an inaccessible signature. Interestingly, the content returned mirrors precisely the content retrieved from the local host.
The mobile app
Reverse engineering iPhone applications can be a challenging task, particularly for individuals lacking the requisite skills. Conversely, Android apps are relatively easier to reverse engineer. In contrast, the reverse engineering of Android apps is comparatively more accessible. The underlying reason is that Android apps are commonly coded in Java, and there exist several decompilers capable of producing Java source code that is, to varying degrees, readable.
With this consideration, I headed over to https://apkpure.com/ultrasync/com.uhssystems.ultrasyncplus/versions and downloaded the latest version that coincidently shared the same version number as the app on my iPhone. Despite the APK remaining unreadable, I proceeded to https://www.decompiler.com/ and obtained the decompiled source code.
In the realm of Java development, a best practice involves initiating module folders with com/[company]/[appname]. This organizational structure proves valuable when seeking specific source code. In our case, the goal is to uncover the login mechanism and the signature generator. After a thorough examination of all the source files, the following files emerged as particularly noteworthy:
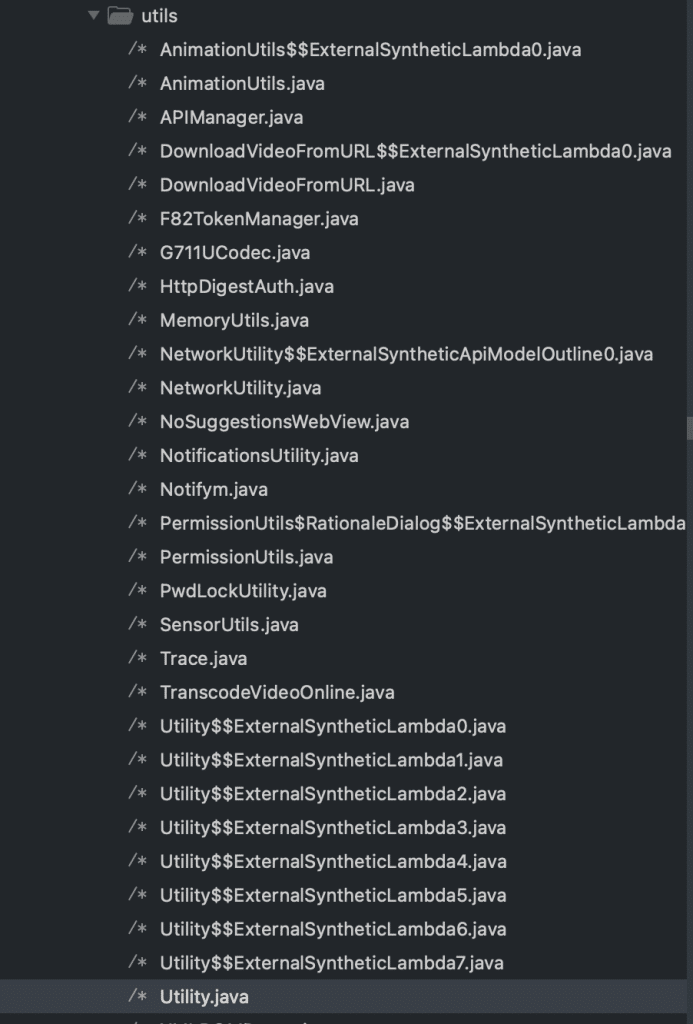
Of particular significance are APIManager.java and the referenced Utility.java. These files are key focal points in our quest to understand the intricacies of the application’s API management and the associated utility functions.
The post_replay function within APIManager.java holds the responsibility for the payload examined through the proxy. Notably, this function also references the getSignature function
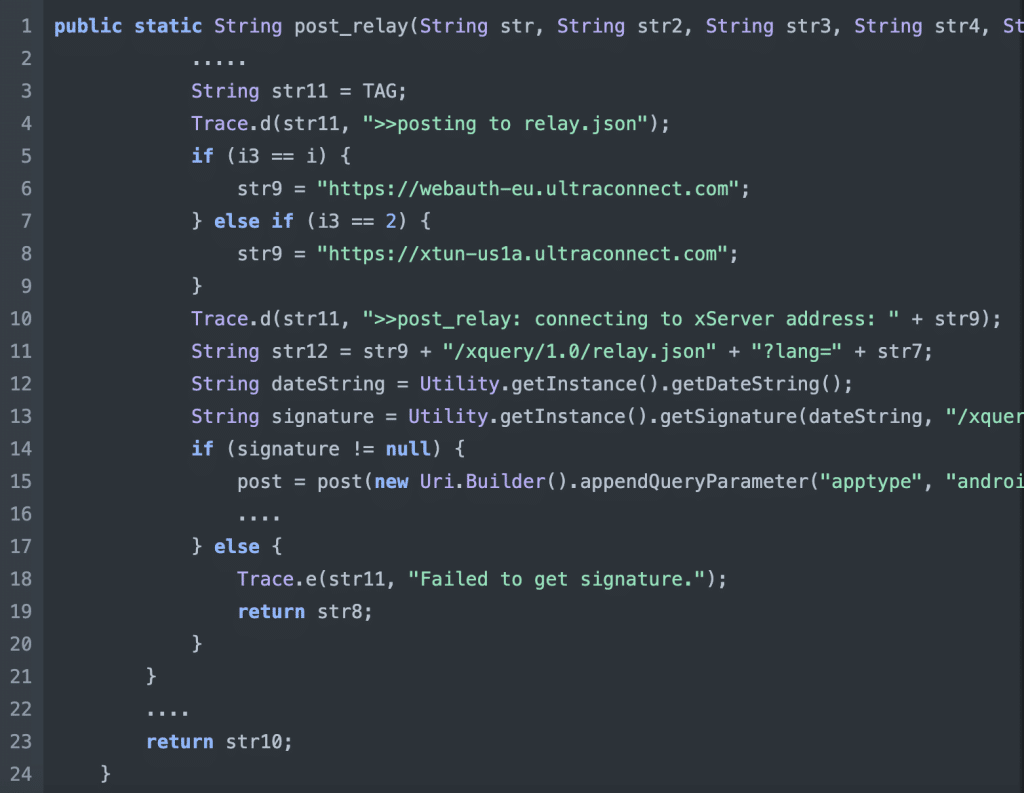
This function reveals that the signature is generated using the current date, the path, and the user’s ID. The logical next step is to explore the Utility.java class and its signature method, as it is likely to provide further details on the specific process of signature generation within the application.

![]() Just when it seemed like we were on the home stretch, attempting to replicate the functionality in Python and sign the API requests hit a roadblock. The crucial getPreSharedMasterKey was nowhere to be found. Without access to this master key, the signature generation process remains a mistery. This unexpected hurdle introduces a new layer of complexity to our exploration.
Just when it seemed like we were on the home stretch, attempting to replicate the functionality in Python and sign the API requests hit a roadblock. The crucial getPreSharedMasterKey was nowhere to be found. Without access to this master key, the signature generation process remains a mistery. This unexpected hurdle introduces a new layer of complexity to our exploration. ![]()
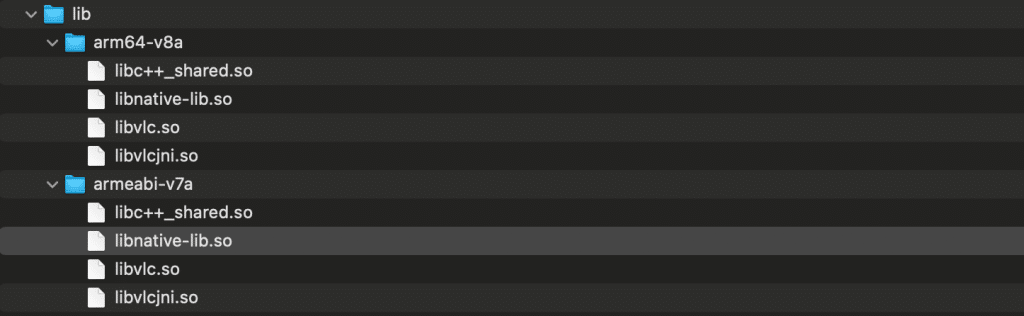
Before conceding defeat, I decided to conduct a more extensive search and stumbled upon some precompiled binary files, the nature of which was unfamiliar to me. This discovery presented a potential avenue that might hold the missing pieces to our puzzle.
Enter Hopper Disassembler, a beacon of hope in this situation. While there are indeed more advanced tools for debugging assembly code, I recognize that this is not my area of expertise, and I’ll defer that task to the professionals.
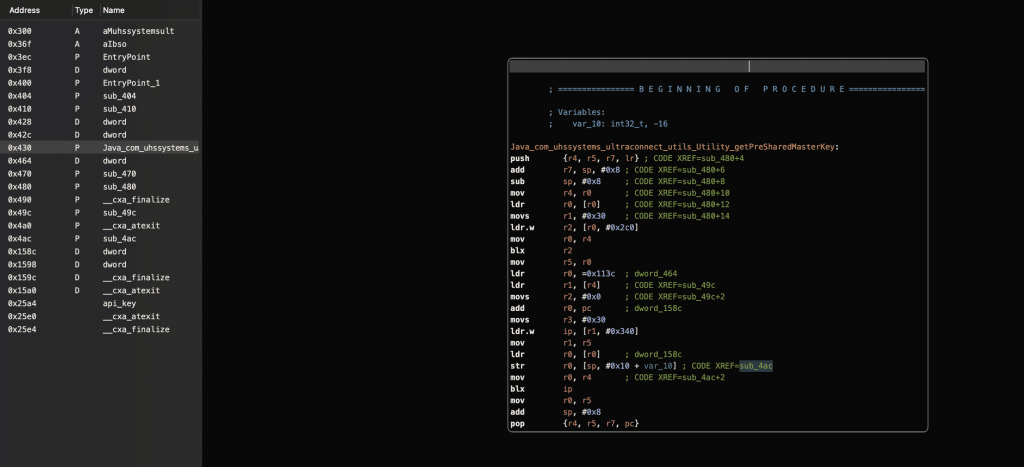
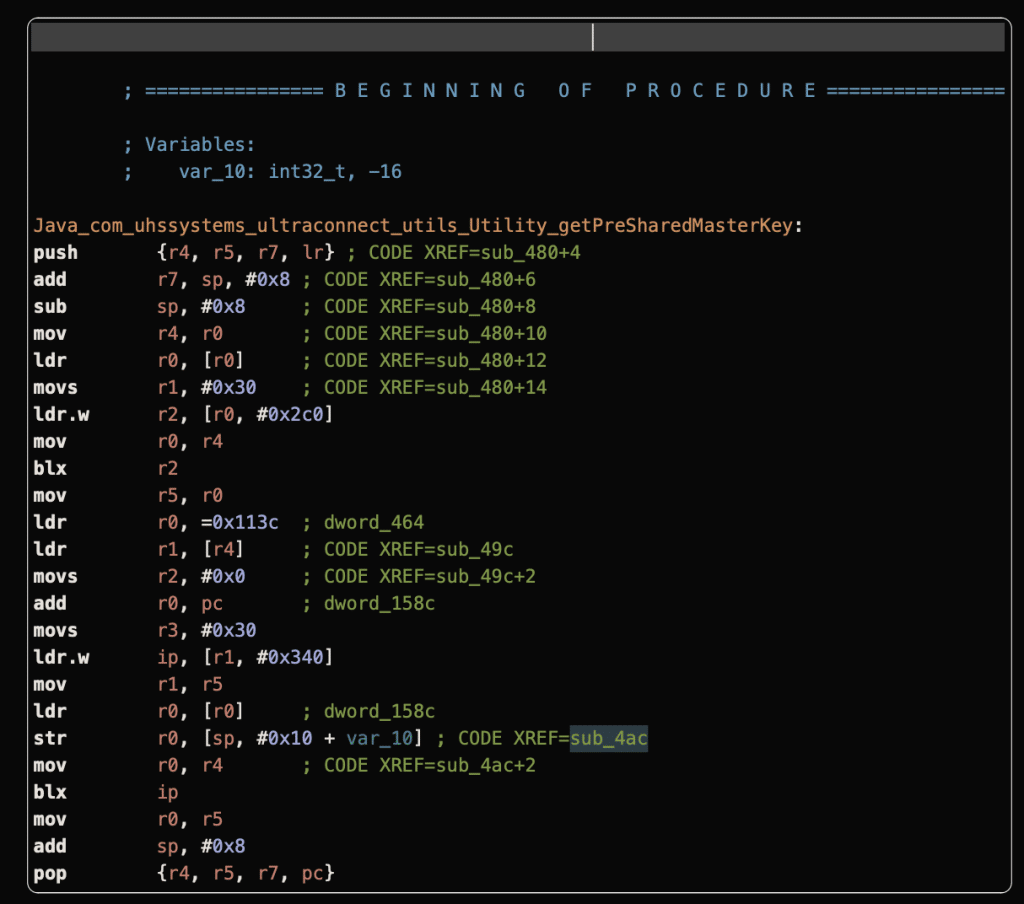
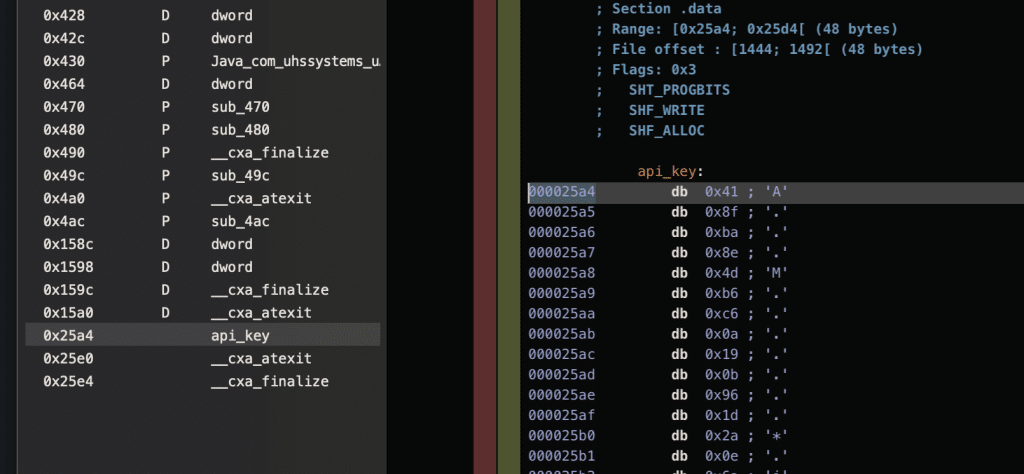
Upon decompiling the module, the getPreSharedMasterKey function appears to be bundled within this binary file. Further analysis of the file reveals the presence of an api_key, conveniently storing the key used for signing the API calls. This finding is a significant breakthrough, shedding light on the missing link in our quest to replicate the application’s functionality in Python.
Signing the API request
Having successfully obtained the Java signature code and the elusive master key, the next step involved reaching out to ChatGPT for assistance in generating the equivalent Python code. Since Home Assistant is written in Python, it only makes sense to have the code in the same language.
After generating a signature and utilizing Burp’s replication, I initiated a request to the relay server. To my not-so-much surprise, the server responded with an “Invalid Signature” message.
![]() I considered the possibility of a unique approach to Java’s use of HMAC. To delve into this, I crafted a basic Java CLI solely dedicated to the signing code. The goal was to gain a clearer understanding of Java’s HMAC mechanism for signature generation.
I considered the possibility of a unique approach to Java’s use of HMAC. To delve into this, I crafted a basic Java CLI solely dedicated to the signing code. The goal was to gain a clearer understanding of Java’s HMAC mechanism for signature generation.
And things get even more confusing. Now the Java code is exactly the same as the one found in the mobile app source code, however, the signature still does not work and the result is different to the one generated by the Python application.
![]() At this point I was confused. The signing function is behaving differently compared to the one in the mobile app. The binary code might be altering the api_key before its return, or perhaps there’s an issue with the key itself.
At this point I was confused. The signing function is behaving differently compared to the one in the mobile app. The binary code might be altering the api_key before its return, or perhaps there’s an issue with the key itself.
![]() I know from experience that over time, the quality of an application’s code is subject to change. Initially, it may be unpolished and hastily put together, but with iteration and practice, the code can become sophisticated and well-crafted. With that in mind, I downloaded the earliest available version of the application and discovered that the master_key was hardcoded in the source code. Not only that, but it had the same value as the binary code.
I know from experience that over time, the quality of an application’s code is subject to change. Initially, it may be unpolished and hastily put together, but with iteration and practice, the code can become sophisticated and well-crafted. With that in mind, I downloaded the earliest available version of the application and discovered that the master_key was hardcoded in the source code. Not only that, but it had the same value as the binary code.
private static final byte[] master_key = {.......}
ChatCGP is wrong!
Despite confirming the correctness of the master key, the two codes continued to generate different signatures. Let’s revisit the two source codes shared above and attempt to pinpoint the source of this discrepancy.
Looking at the code
At this point, I decided to thoroughly understand how the code works and try to understand the syntax used both in Java and Python.
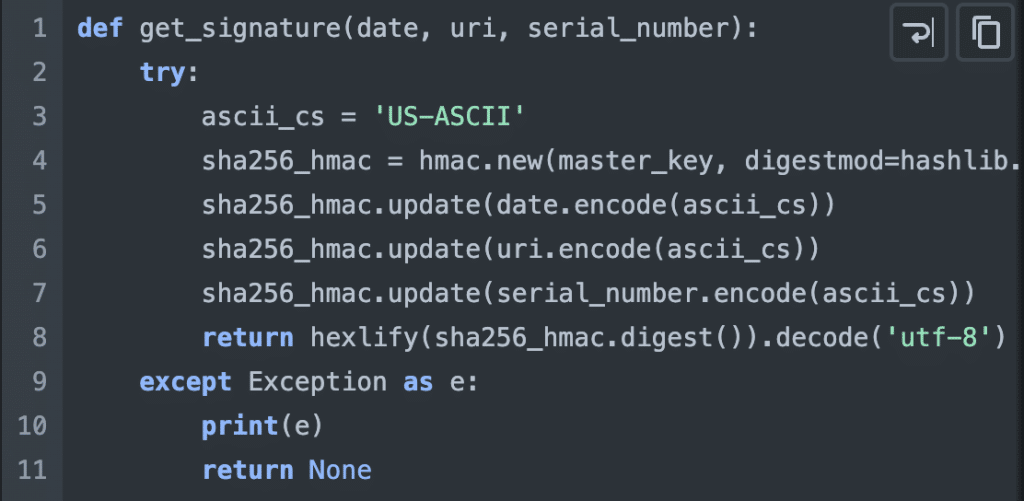
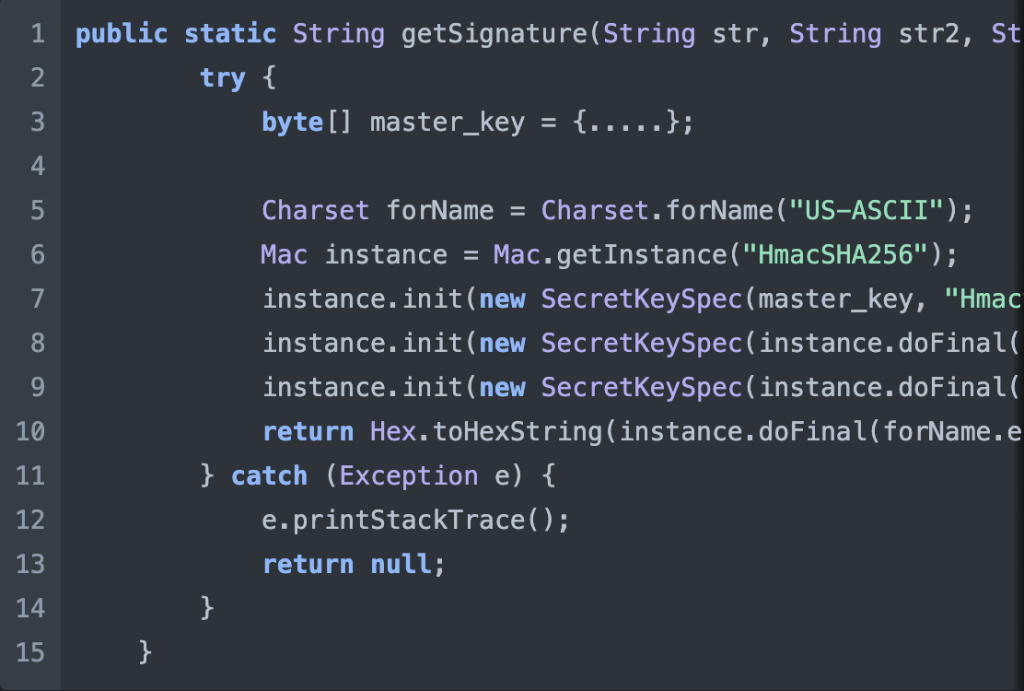
ChatGPT was wrong! The Java code performs three initializations, whereas the Python code performs three updates. I assume that you might be experiencing an “Ahhhh” moment, as I did. Essentially, the Java code signs the date with the master key, which is then used as the signing key for the path, and the resulting signature is used to sign the user ID. On the other hand, the Python code concatenates all strings and signs them with the master key.
The correct Python script will look like this:

The remote server refuses the signature
Both the Python and Java code now generate identical signatures. However, the remote server still rejects it.
REQUEST
REPLY

What did go wrong?
Android is not iPhone!
![]() What happens if the payload and signature used by the iPhone differ from those used by the Android version?
What happens if the payload and signature used by the iPhone differ from those used by the Android version?
At that point, I realised that in the Java code, I saw references to android-ultraconnect while in Burp repeater I was using ios-ultraconnect ![]() . The signature was accepted after changing the app type to android-ultraconnect!
. The signature was accepted after changing the app type to android-ultraconnect! ![]()
![]() Android is not iPhone, and the backend is using a different signing mechanism for different devices. ChatGPT is wrong! and we can fake whatever apptype we want.
Android is not iPhone, and the backend is using a different signing mechanism for different devices. ChatGPT is wrong! and we can fake whatever apptype we want.
Home Assistant is working again!
With the successful connection to the relay server, the next step involved updating the automation server’s code to authenticate with the remote server and reuse the session. Home Assistant can now effectively control the security system, and the achieved latency levels are relatively low.

Best practices
Insecure Communication
The app does not properly validate SSL/TLS certificates, leaving it vulnerable to man-in-the-middle (MITM) attacks. It would have been much harder to reverse engineer the payloads without the proxy access.
Use certificate pinning to protect against MITM attacks. The apps should define the locations to which it connects (their backend server) and inherently trust the infrastructure to which they connect, therefore it’s acceptable (and often more secure) to use a “private” public-key infrastructure, separate from public certificate authorities. #6
Whenever that is not possible implement proper certificate validation, which consists of two parts:
- Certificate validation: Certificates presented to the app must be fully validated by the app and be signed by a trusted root CA.
- Hostname validation: The app must check and verify that the hostname (Common Name or CN) extracted from the certificate matches that of the host with which the app intends to communicate.
Insecure Data Storage
Sensitive data should not be stored in the mobile application, including master keys, private keys, and API keys. In this instance, the master key could have been generated at login time uniquely for the user and should be short-lived. There are more advanced techniques as you can read in this blog post Mobile API Security Techniques Part 3 and Insecure data storage in mobile apps | CQR