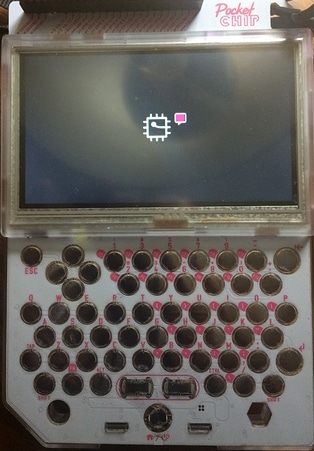
I have been using my PocketC.H.I.P. for a couple of months now as an interactive wall display as described here. At some point I forgot to plug it in and once the battery depleted it would not start again.
It’s stuck after loading the bar pictured in the “speech icon” which is purple at what appears to be 100%.
To revive the PocketCHIP, I tried a few methods until a finally got to one that worked. I will save you some time by listing the ones that are problematic to make it work 🙂
First of all Next Thing Co. vent into insolvency so you can’t expect any official support. The online flasher that was meant to solve these issues is not working anymore.
What did not work
I tried to connect to the PocketCHIP via serial port using WIN 10; however, the drivers were not correct and messed around with it, still did not give me access.
Using a live Ubuntu image I tried to install the tools to flash the board. It did not work due to dependencies.
Then I tried Vagrant with Virtualbox both on Ubuntu and MacOS, but mapping the USB port to the virtual box did not work. The USB device did not show up in the USB device list.
Flashing manually via Linux
I ended up using a spare laptop with Ubuntu 18.04 installed. All dependencies installed without any issues and finally, I was able to flash the board.
Different websites have information on how you can flash the CHIP offline, but since nextthing.co doesn’t exist anymore, I had to combine the data from the various sites.
In a nutshell here is what you need to do:
Clone the CHIP-SDK Git repository
Assuming you have git in your PATH, open up a terminal and type:
git clone https://github.com/NextThingCo/CHIP-SDK(alternative location in case the github account is deleted: https://github.com/cpeter/CHIP-SDK/)
You can try the Vagrant script, but as I mentioned I had problems with the USB port so instead run the setup script:
bash setup_ubuntu1404.sh
If all goes well, you will have all the tools you need for flashing the PocketCHIP.
CHIP operating system images
We will need all the binary files that will be copied to the board and they can be found here. Note that CHIP operating system images are compressed by 7-Zip, and they must be manually decompressed before running chip-flash-firmware.sh script.
On you downloaded the system image files in CHIP-tools directory, execute:
FEL='sudo sunxi-fel' FASTBOOT='sudo fastboot' SNIB=false ./chip-update-firmware.sh -L ../stable-pocketchip-b149.
At this point the flashing script will look for the CHIP but might not be able to connect unless you already jumpered the chip for flashing mode.
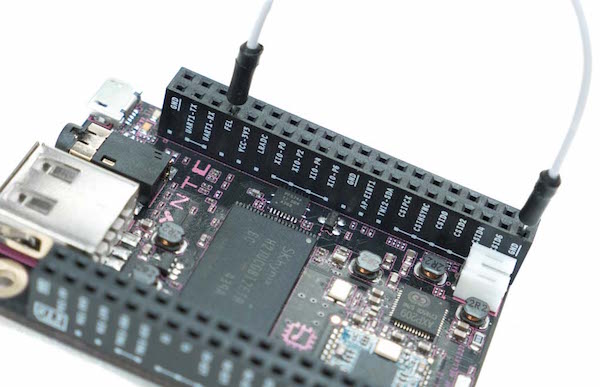
Prepare your C.H.I.P. for Flashing
First, prepare CHIP with a jumper wire between the FEL pin and GND. In other words, connect Pin 7 and Pin 39 on header U14.
Here’s a diagram that labels the headers and pins assuming the components are facing you and the USB port is oriented up:
Installer script
After flashing the device you will loose all your data. I used this handy script to install a few tools and set up some aliases.
wget https://bit.ly/buildpchip
bash buildpchip
You might also want to update your local timezone:
ls -s /usr/share/zoneinfo/Australia/Sydney /etc/localtime
sudo dpkg-reconfigure tzdata
The last thing remaning is to update the Debian repository by replacing “opensource.nextthing.co ” with “chip.jfpossibilities.com ” in your “/etc/apt/sources.list” file. The final line should look like:
deb http://chip.jfpossibilities.com/chip/debian/repo jessie main
Please note that there could be security implications if you change the Debian repository source. Basically you are trusting that person to provide clean/unaltered packages.
Battery is loosing charge and chip will shot down
A final note, if you chips battery is wearing off the chip will shut down automatically regardless if it’s plugged in or not. I had to edit `/etc/UPower/UPower.conf` and commented the line:
#CriticalPowerAction=HybridSleep
In addition I run this command as well:
for i in batt off00 warn05 warn15 load ; do echo $i ; systemctl disable pocketchip-$i.timer ; systemctl stop pocketchip-$i.service ; done
References
You can download the modified extension from https://fc.fdf.net/extension.zip 40 . UnZIP it and drop the directory/folder into chrome://extensions in Chrome to load it. The only change is the list of external sites allowed in the manifest.json file.
Once loaded, you can then go to https://fc.fdf.net/ 42 for CHIP & PocketCHIP or https://fc.fdf.net/pro 9 for CHIP Pro. Everything should just work the same as the https://flash.getchip.com/ 5 site.
The ONLY modifications in the server-side code were the URLs to not point to the now broken links and I unminified everything to make it easier for people to download the code and inspect it. The few bytes saved wasn’t worth it. I also removed the part of the JavaScript that sends your CHIP type to the server. What kind of CHIP you have is your business, not mine :).
Known issue: Archive.org 2 didn’t seem to mirror the sound effects nor the OS type pictures, so the pictures won’t work. Everything else should just work.
To prove that none of the .chp files have been tampered with, you can compare the md5sum & size information from http://tinyurl.com/y8j5bf98 11 to the ones at https://fc.fdf.net/flashImages.json 10 .
Let me know if you run into any issues!